Thursday, June 18, 2009

"Pop Up" Card Projects

Hi--Yes, I'm back again. Thank you for your patience--although I must say, mine is running a little thin! Computer issues make me want to scream!! And I thought I was all backed up (learned my lesson a couple years ago), but I've come to find out that not everything transfers or some silly thing. No contacts, no bookmarks, no passwords. . . I'm about ready to fire my resident techno-geeks! (deep breaths, deep breaths. . . ) One of them also swapped out the memory card in my camera, giving me one that doesn't work in my computer, even when it is operational!!! Don't they know blogs without pictures are pretty boring???

Okay, enough venting. On to something I SHOULD have been able to show you WEEKS ago! (Okay, maybe I wasn't quite finished venting.) One of the projects the stamp clubs did at the beginning of the month was a variation of a pop-up card that is really quite easy and pretty impressive.

We made a birthday card using the soon-to-be retired "Big Bold Birthday" stamp set. Pretty standard on the outside. . .


. . .a whole "party" on the inside!

The "pop ups" are anchored to the inside of the card using thin strips of "window plastic" (AKA transparency sheets, acetate sheets). (I especially like this method for balloons--because balloon strings can be drawn on the plastic strips with a Sharpie marker!) The strips can be as long or as short as you want them to be, depending on the doo-dads you include on the inside. Just make sure that they fit inside the card when it's closed.

The strips are adhered with Sticky Strip or another double-stick tape, to a piece of accordian-folded paper that is placed in the fold of the card. The accordian piece, made from paper rather than cardstock to cut down on bulk, measures 3" X 5". The piece of paper is scored every 1/2" and folded "back and forth and back and forth." Once folded, it sort of looks like a V with training wheels!


I've made a few of these cards in the last several weeks. This next one was my first attempt, again using a retiring set, "Great Grads."


For this one, instead of a rectangular piece of paper folded to hold the pop-ups, I used a Big Shot die cut "Top Note" that I scored and folded every half inch and anchored into the center of the card with a strip of Sticky strip. I liked the "fancy" edge on the inside, but wasn't as pleased with the "durability" of this one. I'm not sure if the center piece will stay in there reliably with just the Sticky Strip. But the recipient of this card probably doesn't care much--he was more interested in what was tucked in the pocket that I made on the inside.


Most recently I made a card for my dad for Father's Day, using the "Totally Tool" set and letter die cuts from my Big Shot. This card was sized to fit in a business-size envelope.


Same accordian-folded piece, made from Designer Paper, measuring 6" X 3", is holding my inside pieces. . .


This is a side view to show you more of the detail of the accordian-fold piece. The ends of the "V" (the parts I called "training wheels" earlier) are "hidden" under 2 pieces of stamped cardstock. I also included pockets for "goodies" in this card.

Here is how I did that:


Before gluing the inside pieces down, I cut a slit as wide as I needed the pocket to be, and then added a "thumb tab" thingy with a circle punch. I used Sticky Strip to adhere these to the card just to make sure that they would stay in place.

Lots of different ways you could use this method of "pop-up," and I like that lots can be going on inside the card without turning it into a major engineering project.

Whew! I made to the end of a blog post without anything on my desk blowing up! How 'bout that! Before I go, a couple of reminders. . .

*the "Last Chance for Summer Fun" party (formerly known as the retirement party) is next Friday, June 26th, at 6:30 PM. It's a Mystery Hostess Party, meaning that we'll be raffling off the hostess benefits that night, and also, for each $50 purchase, you can take home one of my retiring stamp sets. I have a collection of over 75 sets looking for new homes. Email or call me to let me know if you'll be joining the fun!

*I'm currently taking "Pre-orders" for the new catalog that will be coming out July 1st. You can reserve a copy for yourself for $5 until June 30th, or get a copy for FREE by joining a stamp club or booking a workshop date. After June 30th the catalog returns to the regular price of $9.95.

*Mark Friday, July 24th on your calendar. The New Catalog Open House will be held that day from 11 AM -7 PM. New stuff on display and stamping too!

Have a great weekend!


Thursday, June 11, 2009

"Last Chance for Summer Fun!" (Not really, but that's what I'm calling the Retirement Party this year!)

Yes, once again I'll tell you, I'm still alive. Thanks to those of you who are persistant and keep checking to see if I've updated this blog. I get a numbers report on this thing, unintentionally adding to my guilt about not getting on here as much as I intend to, so I know you keep checking on me. Hang in there--I think I'll be getting my act together soon!

So, as promised, I'm back with details on the upcoming retirement party. Hope you'll be able to join in the fun!

**Friday, June 26, 2009, 6:30 PM**
at my home--S6W31661 Christopher Way, Delafield

Enjoy a GREAT evening of stamping and surprises featuring this year's Stampin' Up! retiring stamp sets! Adding to the excitement is the bin of my retiring stamp sets! For each $50 you spend, you get to take one of my retiring sets home FREE!

**DOOR PRIZES**2 MAKE & TAKE PROJECTS**REFRESHMENTS**

**DRAWINGS AT 8:30 PM TO WIN HOSTESS BENEFITS**

Lots of Ways to Earn Tickets for the Drawing!!

**1 ticket for RSVPing by June 22nd

**1 ticket for arriving by 6:35 PM

**1 ticket for each $25 order

**2 tickets for bringing an outside order (maybe from a friend who can't make it to the party?)

**2 tickets for bringing a friend that I have not met

**2 tickets for pre-ordering a 2009-2010 Idea Book & Catalog

**5 tickets for signing up for a Stamp Club (Clubs start in September and meet monthly)

**5 tickets for booking a workshop date

**10 tickets for signing up to become a demo

Hope you can join the party!! RSVP today!!

For further information or to RSVP, email live2stamp@wi.rr.com or call (262)264-0201


Monday, June 1, 2009

Last Chance List

Yeah, yeah. I know I've been AWOL for a really, really long time. Even I was surprised how long it had been since I'd updated. My laundry list of excuses reads like the "Twelve Days of Christmas," and one of these days I may bore you with all our adventures, but for right now I know the majority of you are more interested in seeing the list of retiring stamp sets and accessories. The lists have undergone a little "makeover" and are now called the "Last Chance" lists, but it'll take us all a while to start calling them that, I'm sure.

Click on the graphic on the right and it'll take you to my SU website so you can see what won't be around much longer. You can order your selections on the spot if you wish, which might not be a bad idea if there is something on the Accessories list that you really want, or you can call or email me and I'll place your order for you.

(I will be holding my "retirement" party as usual (on June 26th--6:30 PM), where, with each $50 purchase you get to choose a set from my retired stamp set bins, but that may be too late to order some of the accessories.)

If you prefer to print out a list and sit down with your catalog, that's available here. Quite a few of the Decor Elements items will be updated, and so that list is rather extensive. Take a look and add a new look to a room or project!

So, do I gamble and go add some more stain to my decks??? (Yes, that has been one of my projects lately.) Or, I could go "experience" the visual impact of this retiring--ahem--Last Chance--list on my stamp shelves. About 30 of the sets on the list are in my collection--I didn't think I had that many! Wow, those shelves are really going to look bare! Guess that means it'll HAVE to be a rebuilding year!

Tuesday, March 31, 2009

"Get Connected" Spring Occasions Mini Catalog Special!!


(We're turning the page on a new month tomorrow and I'm not trying to rush it, but I'm jumping in about 12 hours early to announce an April special so that my stamping club members have a bit of time to think about it before their meetings tomorrow and Thursday.)

Just in time for the release of the new Spring "Occasions" Mini Catalog, Stampin' Up! is offering a special so you can "get connected" by staying in touch with those who matter most to you--and what better way than through creating a handmade creation!

When you purchase $40 worth of products from the Occasions Mini Catalog, you can choose one of the "Under $10" products that are shown on page 208 of the catalog. (Bet a lot of you haven't even seen this page!) There are individual stamps for a variety of occasions and mini note kits that include a double-mounted stamp, 4 gift notes with envelopes and a Chocolate Chip Stampin' Spot. All of these would make it super-simple to send out a quick greeting to someone special!

Go grab your catalog and turn to page 208 (or click here) to see the items you can get for free with your Occasions Mini purchase!

They include:
"Note of Thanks" Mini Note Kit (116209) $9.95 value
"Birthdays Count" Mini Note Kit (116210) $9.95 value
"Forever" stamp (114494) $5.95 value
"Beautiful Baby" stamp (114492) $5.95 value
"Birthday Wish" stamp (114486) $5.95 value
"Glad Friends" stamp (114490) $5.95 value
"Flowers in Silhouette" stamp (114498) $7.95 value
"Celebrations" stamp (114496) $7.95 value
"Elegant Thank You" stamp (114484) $6.95 value
"Fun Flowers" stamp (114488) $5.95 value

Also, if you're one of my workshop hostesses during April, you'll get to choose one of these items in addition to your regular hostess benefits! I'm nearly booked for the month, but contact me if you'd like to do a home workshop (or a book party) and I'm sure we can figure out something that will work.

Saturday, March 21, 2009

Spring-y Shapes!

Wow! How 'bout that! No snowstorm this weekend! I really thought having a spring-themed class might jinx me and the driveway would be filled with snow! I got lucky!

Some of my class registrants didn't get any of that luck though! I had more phone calls than I like from stampers who had succumbed to that darn flu bug. Hope you ladies all feel better soon! Thought I'd share what we did in class, just so you don't feel totally left out.

As "advertised," this class was all about spring cards that were somehow shaped so they weren't "just" an everyday rectangular card. We did the four cards pictured below while we experimented with some new folds, techniques and Big Shot toys.

This first card didn't involve any stamping at all. Instead we folded circles of Designer Paper (from the Sale-A-Bration pack) using the "Dahlia" fold technique. We used the cutter kit and a cutting mat to shape the stem, and ran a scrap of Certainly Celery cardstock through the crimper and then punched an oval to give us leaves. A couple of pearl embellishments jazz up the flowers a bit.


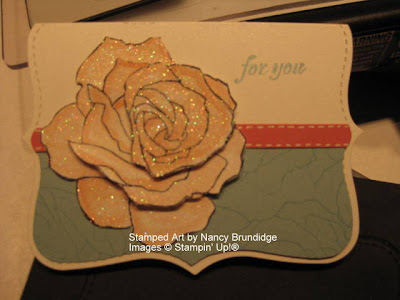
The second card used the "Top Note" die for the Big Shot as the base for the card. Placing a regular folded card base on the die so the fold is just under the little score marks and running it through the machine will give you this versatile card base. For this card Shimmery White cardstock was used because it is a bit heavier than Whisper White cardstock, and, well, because I just LOVE the stuff!! I always seem to be adding a pack to each order I place "just in case!" :-)

The rose image is from the new "Fifth Avenue Floral" stamp set and we actually used two different techniques to get it. After watercoloring 3 separate stampings of the rose with Tangerine Tango ink, all three images were covered with Versamark ink and Irridescent Ice embossing powder and heated. ("Diamond Dust" technique) The images were then cut out, with each image being "just a layer" smaller than the one under it. The layers are then adhered together with Dimensionals, giving this cool 3-D effect. ("Paper Tole" technique) The rose is also done with Shimmery White cardstock because its weight is good for watercoloring.

The Tangerine Tango "ribbon" you see running through the center of the card really isn't ribbon at all, but a strip of cardstock with white gel pen "faux stitching." The Baja Breeze cardstock on the lower half of the card is just half of another "Top Note" shape with the score marks cut away and a few stamps of the rose with Baja Breeze ink.


This next card again has a base made using a Big Shot die, this time the "Scallop Circle." A regular card base gets placed on the scallop die, with the fold just below about 5 of the scallops. The Bashful Blue circle was also cut out with the Big Shot, using the "Clear Circle" die. The circle is stamped with one of the "Sweet Stems" and a sentiment from "Simply Said," colored in a bit and embellished with Crystal Effects and a linen thread bow. Piercing the scallops on the card base added some visual interest and really made a difference in the look of the card. Because the card is a little smaller than the envelope, a strip of cardstock was adhere to the inside of the envelope after punching the envelope with the Trio Flower punch.

Two of my new favorite "accessories" for using the dies is my Dotto repositionable adhesive and my white gel pen! I've been placing a bit of the adhesive right on the outside edges of the black cushion on the die to hold cardstock in place when it's really important that it not move--like when making these card bases! The adhesive usually comes right off on the scrap sides of the card, or it can just be rubbed off the die if some stays behind.


The gel pen makes great "cheater marks" on the black cushion, so it's easier to see that the cardstock is positioned correctly. If I can see a white mark peaking out, I know that I'll be losing a bit of a scallop.


The last of the four cards is this cute flower pot card that I "cased" from a demo in Florida. The Big Shot was called into duty again to help cut out the flowers from the "Spring Flowers" Sizzlets set. The Boho Blossoms punch made quick work of the flower centers, and the Scallop Edge punch added interest to the rim of the "pot."

The "extra-fun" thing about this card is that the flowers lift out of the pot to reveal the inside sentiment. "Interactive" cards are so neat!

Hope this weekend sunshine is making everyone feel just a bit better! See you later!!

Friday, March 13, 2009

A Few Spots Left for "Spring-y Shapes" Class Next Weekend

So, yeah, I'm probably going to "induce" a huge snow storm with this class I'm having next weekend, but too bad--we need to get together to stamp!!

We'll be doing 4 cards that aren't just the usual rectangular variety (but will still fit in a rectangular envelope). A lot of you already registered for this class at the Sale-A-Bration party last month, but there are still a few spots available on Friday, March 20th, 6:30 PM – 9:00PM (1 spot left) OR Saturday, March 21st, 1-3:30 PM (3 spots left). $13 materials fee * Your payment in your RSVP. Registration deadline March 16th.

Hope you can join us!

Sneak Peak: Spring Occasions Mini Catalog

Any day now, if you're on my customer list, you should be finding a new Spring Occasions Mini Catalog in your mailbox! It's full of all sorts of Spring- and Summer-themed stamp sets, paper, embellishments and samples that will be available to order from April 1st-June 30th.

A few of the stamp sets and one wheel are perfect for Easter. To allow you to get working on Easter projects now, Stampin' Up! has made these sets available now as a sneak peak. I have the sets pictured below (smaller than "real life" size--to see full-size pics click here.) To order any of these items shown below, email me or shop 24/7 on my SU website here. (Orders that include these sets can qualify for free Sale-A-Bration products if the order totals $50 or more!)

Blog Widget by LinkWithin