Tuesday, March 31, 2009

"Get Connected" Spring Occasions Mini Catalog Special!!


(We're turning the page on a new month tomorrow and I'm not trying to rush it, but I'm jumping in about 12 hours early to announce an April special so that my stamping club members have a bit of time to think about it before their meetings tomorrow and Thursday.)

Just in time for the release of the new Spring "Occasions" Mini Catalog, Stampin' Up! is offering a special so you can "get connected" by staying in touch with those who matter most to you--and what better way than through creating a handmade creation!

When you purchase $40 worth of products from the Occasions Mini Catalog, you can choose one of the "Under $10" products that are shown on page 208 of the catalog. (Bet a lot of you haven't even seen this page!) There are individual stamps for a variety of occasions and mini note kits that include a double-mounted stamp, 4 gift notes with envelopes and a Chocolate Chip Stampin' Spot. All of these would make it super-simple to send out a quick greeting to someone special!

Go grab your catalog and turn to page 208 (or click here) to see the items you can get for free with your Occasions Mini purchase!

They include:
"Note of Thanks" Mini Note Kit (116209) $9.95 value
"Birthdays Count" Mini Note Kit (116210) $9.95 value
"Forever" stamp (114494) $5.95 value
"Beautiful Baby" stamp (114492) $5.95 value
"Birthday Wish" stamp (114486) $5.95 value
"Glad Friends" stamp (114490) $5.95 value
"Flowers in Silhouette" stamp (114498) $7.95 value
"Celebrations" stamp (114496) $7.95 value
"Elegant Thank You" stamp (114484) $6.95 value
"Fun Flowers" stamp (114488) $5.95 value

Also, if you're one of my workshop hostesses during April, you'll get to choose one of these items in addition to your regular hostess benefits! I'm nearly booked for the month, but contact me if you'd like to do a home workshop (or a book party) and I'm sure we can figure out something that will work.

Saturday, March 21, 2009

Spring-y Shapes!

Wow! How 'bout that! No snowstorm this weekend! I really thought having a spring-themed class might jinx me and the driveway would be filled with snow! I got lucky!

Some of my class registrants didn't get any of that luck though! I had more phone calls than I like from stampers who had succumbed to that darn flu bug. Hope you ladies all feel better soon! Thought I'd share what we did in class, just so you don't feel totally left out.

As "advertised," this class was all about spring cards that were somehow shaped so they weren't "just" an everyday rectangular card. We did the four cards pictured below while we experimented with some new folds, techniques and Big Shot toys.

This first card didn't involve any stamping at all. Instead we folded circles of Designer Paper (from the Sale-A-Bration pack) using the "Dahlia" fold technique. We used the cutter kit and a cutting mat to shape the stem, and ran a scrap of Certainly Celery cardstock through the crimper and then punched an oval to give us leaves. A couple of pearl embellishments jazz up the flowers a bit.


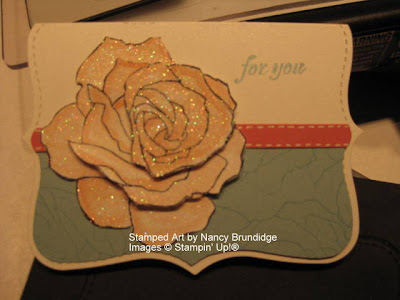
The second card used the "Top Note" die for the Big Shot as the base for the card. Placing a regular folded card base on the die so the fold is just under the little score marks and running it through the machine will give you this versatile card base. For this card Shimmery White cardstock was used because it is a bit heavier than Whisper White cardstock, and, well, because I just LOVE the stuff!! I always seem to be adding a pack to each order I place "just in case!" :-)

The rose image is from the new "Fifth Avenue Floral" stamp set and we actually used two different techniques to get it. After watercoloring 3 separate stampings of the rose with Tangerine Tango ink, all three images were covered with Versamark ink and Irridescent Ice embossing powder and heated. ("Diamond Dust" technique) The images were then cut out, with each image being "just a layer" smaller than the one under it. The layers are then adhered together with Dimensionals, giving this cool 3-D effect. ("Paper Tole" technique) The rose is also done with Shimmery White cardstock because its weight is good for watercoloring.

The Tangerine Tango "ribbon" you see running through the center of the card really isn't ribbon at all, but a strip of cardstock with white gel pen "faux stitching." The Baja Breeze cardstock on the lower half of the card is just half of another "Top Note" shape with the score marks cut away and a few stamps of the rose with Baja Breeze ink.


This next card again has a base made using a Big Shot die, this time the "Scallop Circle." A regular card base gets placed on the scallop die, with the fold just below about 5 of the scallops. The Bashful Blue circle was also cut out with the Big Shot, using the "Clear Circle" die. The circle is stamped with one of the "Sweet Stems" and a sentiment from "Simply Said," colored in a bit and embellished with Crystal Effects and a linen thread bow. Piercing the scallops on the card base added some visual interest and really made a difference in the look of the card. Because the card is a little smaller than the envelope, a strip of cardstock was adhere to the inside of the envelope after punching the envelope with the Trio Flower punch.

Two of my new favorite "accessories" for using the dies is my Dotto repositionable adhesive and my white gel pen! I've been placing a bit of the adhesive right on the outside edges of the black cushion on the die to hold cardstock in place when it's really important that it not move--like when making these card bases! The adhesive usually comes right off on the scrap sides of the card, or it can just be rubbed off the die if some stays behind.


The gel pen makes great "cheater marks" on the black cushion, so it's easier to see that the cardstock is positioned correctly. If I can see a white mark peaking out, I know that I'll be losing a bit of a scallop.


The last of the four cards is this cute flower pot card that I "cased" from a demo in Florida. The Big Shot was called into duty again to help cut out the flowers from the "Spring Flowers" Sizzlets set. The Boho Blossoms punch made quick work of the flower centers, and the Scallop Edge punch added interest to the rim of the "pot."

The "extra-fun" thing about this card is that the flowers lift out of the pot to reveal the inside sentiment. "Interactive" cards are so neat!

Hope this weekend sunshine is making everyone feel just a bit better! See you later!!

Friday, March 13, 2009

A Few Spots Left for "Spring-y Shapes" Class Next Weekend

So, yeah, I'm probably going to "induce" a huge snow storm with this class I'm having next weekend, but too bad--we need to get together to stamp!!

We'll be doing 4 cards that aren't just the usual rectangular variety (but will still fit in a rectangular envelope). A lot of you already registered for this class at the Sale-A-Bration party last month, but there are still a few spots available on Friday, March 20th, 6:30 PM – 9:00PM (1 spot left) OR Saturday, March 21st, 1-3:30 PM (3 spots left). $13 materials fee * Your payment in your RSVP. Registration deadline March 16th.

Hope you can join us!

Sneak Peak: Spring Occasions Mini Catalog

Any day now, if you're on my customer list, you should be finding a new Spring Occasions Mini Catalog in your mailbox! It's full of all sorts of Spring- and Summer-themed stamp sets, paper, embellishments and samples that will be available to order from April 1st-June 30th.

A few of the stamp sets and one wheel are perfect for Easter. To allow you to get working on Easter projects now, Stampin' Up! has made these sets available now as a sneak peak. I have the sets pictured below (smaller than "real life" size--to see full-size pics click here.) To order any of these items shown below, email me or shop 24/7 on my SU website here. (Orders that include these sets can qualify for free Sale-A-Bration products if the order totals $50 or more!)

Saturday, March 7, 2009

"Rubber" Saves the Day! (Again!)

So, where have I been the last two weeks?? Not trying to ignore you, let me assure you! But as I sat dozing on the couch one evening about ten days ago, my daughter yelled up the stairs, "People, we have a lake down here!" Thinking she was being dramatic about our leaky dehumidifier, I told her to relax. But no, she repeated, "People, we REALLY have a lake down here!" Oh my. Here's where the "rubber saves the day" comes in, not as in "Rubber stamps help relieve my stress." but more like "Thank heavens for Rubbermaid storage containers!"

Suffice to say we spent the next 18 hours without the conveniences of modern plumbing while some great guys came to our aid fixing the issue. The following few days were spent trying to extract all the water from the family room carpet and storage areas--certainly not the way I was planning on spending the week, but in the scope of things, we were pretty lucky. I was just SO thankful that the plumbing and septic system people answered our panicky phone call that night and were able to get things fixed so quickly.

How does all this relate to stamping, you're asking? Enter the OTHER reason I bought the "Totally Tool" stamp set:


I thought it would come in handy for those times when we receive great service and want to express appreciation. Little did I know that I would be using it so soon after ordering it! (Excuse the double watermark on the photo--new photo software! First I couldn't get one on there, and then I suddenly had two, and I have no idea how to remove them!)

In addition to the Totally Tool stamp set, I used the Backgrounds I Texturz plates with brushed silver cardstock to add more of a tough-guy, hardware feel to the card and also embossed the wrench onto more silver. The "Sanded" background is stamped onto all of the red cardstock to add some more dimension. A quick card--but hopefully I won't need to make up too many of these anytime soon!


One extra post script: Because of the Rubbermaid containers, we didn't end up losing too many things to water damage, but one thing that did have to hit the curb WAS stamping-related. You know those newsprint roll-ends that I get to cover the counters and tables that we stamp on? Had an extra one of those downstairs--


It soaked up its share of water, and when it couldn't take it anymore the whole bottom of the roll developed huge cracks! It turned from a $3 stamping tool into a $3 chuckle. Wonder what the garbage guys thought! (And again with the photo software issue! Obviously there's nothing designed or stamped here!)
Blog Widget by LinkWithin